Battlefield 6 Requires Secure Boot: How to Enable and Fix Errors
EA announced that Battlefield 6 from DICE will not launch unless Secure Boot is enabled: the Javelin anti-cheat system verifies that Windows is running in a trusted environment. This requirement makes it harder to load cheat drivers, reduces false-positive bans, and generally improves match stability. On desktop PCs, enabling SB typically requires a single visit to the BIOS.
Still, the absence of Secure Boot support has already locked out the Steam Deck and other Linux platforms where the feature cannot be emulated. DICE implemented new anti-cheat measures in Battlefield 2042 2 months ago, but not all players were pleased, as indicated by Steam reviews.
In this article, we will explore what Secure Boot is and why it is needed, attach instructions for enabling it on different motherboards, and review troubleshooting, because, depending on the MB manufacturer, it can take more than a single toggle of a UEFI setting (especially if you have a Gigabyte motherboard).
What Is Secure Boot?
Secure Boot is a UEFI specification feature in which every stage of the operating system boot is signed with PK and KEK keys stored in the motherboard’s SPI flash. As long as the signature chain remains intact, the firmware continues loading; if a signature is invalid or unrecognized, execution halts until the user intervenes.
Introduced to protect the Windows 8 boot process, the technology is now also used to enforce the integrity of anti-cheat kernels. In Battlefield, Javelin starts before most drivers, allowing it to block suspicious modules even before the game menu appears. EA stresses that all checks are performed locally and no personal data is transmitted to its servers.
How to check Secure Boot state
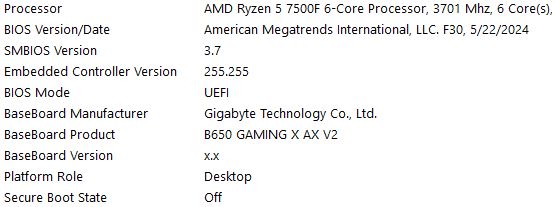
The simplest way to see whether Secure Boot is enabled is from Windows itself: open System Information (press “Win + R”, write “msinfo32”, and click “OK”) and locate the line Secure Boot State:
- Enabled. The game should start without problems.
- Disabled. You need to open the BIOS and change the UEFI settings.
- Not Supported. The system is booting in CSM/Legacy mode or from an MBR drive (more on this later).
Alternatively, run the PowerShell cmdlet Confirm-SecureBootUEFI; it returns True when the feature is active. If you receive the error Cmdlet not supported on this platform, the machine is using a BIOS-compatible boot path, and Secure Boot is unavailable. After confirming the status, you can proceed to configure the firmware, which we cover in the next section.
What to do before enabling Secure Boot
Before touching the firmware, back up your data to an external drive. If something goes wrong, the OS may fail to start. “EA doesn’t take responsibility for changes to your BIOS settings”, so it’s your job to take care of your PC.
Next, confirm that the current boot mode is already UEFI. If you see Legacy/CSM, first update the motherboard’s UEFI firmware to the latest version from the manufacturer’s website, then switch the boot mode to UEFI and restart the PC.
On older systems that still use an MBR disk, run an MBR-to-GPT conversion in Windows PE:
- Press “Win + R”, type ”powershell”, and press ”Ctrl + Shift + Enter” to open an administrative command prompt.
- Make sure the administrative command prompt says Administrator, then type in “mbr2gpt /validate /disk:0 /allowfullOS” and press ”Enter”.
- The disk:0 part of the command should match the number listed in the Disk Properties window under the Volume tab.
- In the same administrative command prompt, write “mbr2gpt /convert /disk:0 /allowfullOS” and press ”Enter”.
- The disk:0 part of the command should match the number listed in the Disk Properties window under the Volume tab.
Only after a successful migration and a second reboot, you should enable Secure Boot, because skipping these steps leaves the option grayed out or can trigger a boot loop.
How to Enable Secure Boot
Enter UEFI setup by pressing Del, F2, F3, F10, or Esc at start-up; the exact key appears on the POST screen. In Advanced mode, locate Boot, then Secure Boot or Security, and finally the Secure Boot option.
And now, separate instructions for individual motherboard manufacturers:
- Asus. Set OS Type to Windows UEFI Mode, save, and reboot; your motherboard will automatically install the default PK/KEK keys.
- MSI. Navigate to Settings, Security, and set Secure Boot to Enabled. When prompted, choose either Standard or Enroll All Factory Keys to ensure the firmware loads its OEM signatures.
- Dell, HP, and Lenovo laptops. The setting is likewise under Security. If it is locked, create an administrator password or disable Factory Mode, then select Enable and confirm. After saving, the first reboot may take longer than usual while the keys initialize.
- Gigabyte. Go to Advanced Mode, Boot, and look for Secure Boot. Enable the option, and then click Install Default Keys. If the item is gray, first set an administrator password, then retry. If you, like me, have a motherboard from Gigabyte, you will likely need to perform additional troubleshooting, which we will consider further.
Secure Boot check
Back in Windows, press “Win + R”, type “msinfo32”, and confirm that Secure Boot State now reads Enabled. For a scripted check, open PowerShell as administrator and run “Confirm-SecureBootUEFI”; the result True means the key chain and the feature are active.
Now launch Battlefield 6 (or 2042), and the Javelin anti-cheat should initialize without errors. If the game still complains that Secure Boot is missing, return to UEFI and manually select Restore Factory Keys or Enroll Factory Keys, then reboot again; occasionally, the OEM keys do not populate on the first attempt, especially after a recent firmware update.
Secure Boot in Battlefield 6: Common Problems
The most frequent complaint is that Battlefield 6 warns about Secure Boot being disabled even after you enabled it. In nearly every case, the firmware’s Secure Boot mode is set to Custom when Standard (sometimes labeled as Factory Keys) is required. Reset the key table, select the standard key set, save, and reboot. The game should then pass the check without errors.
If Windows won’t load after enabling the option, check whether the default boot drive has switched. If it has, switch back to the disk where the OS is installed.
Occasionally, after activating Secure Boot, Windows blue-screens or fails to detect the system drive. The usual cause is that Windows was installed on an MBR-partitioned disk: once UEFI verification is enforced, the firmware drops the legacy bootloader. The only reliable fix is to convert the volume to GPT; if problems persist, roll back from the latest Windows build, which has conflicted with specific storage drivers for some users.
“PK/KEK keys not found” errors appear when Device Guard or Platform Mode was changed before Secure Boot was enabled. Return to the BIOS, disable Device Guard, choose Reset PK/KEK, select Enroll All Factory Keys, reboot, and then re-enable Secure Boot; Battlefield should launch once the keys are rescanned.
Dual-boot users (Linux + Windows) may notice longer start-ups or that a self-compiled kernel no longer loads. Two workarounds exist: sign your shim bootloader with a Microsoft-signed key, or create a separate, non-verified boot profile and switch it on demand. Most players choose the latter for Battlefield stability.
Sometimes, Javelin throws an anti-cheat error when Battlefield is launched via the Steam and EA App chain. In case of error, a better order would be:
- Exit Steam completely and run the EA App as an administrator.
- Launch the game in the EA App and wait until it launches Steam and opens BF6 on its own.
- Javelin now loads first, detects Secure Boot, and allows the game to be played.
- If the game runs cleanly, you can return to launching it directly from Steam; no additional BIOS changes are needed.
Owners of the Steam Deck and other Linux handhelds face a different obstacle: Proton cannot emulate Secure Boot, so Battlefield 6 is literally unplayable. For now, the only workaround is to stream the game from a PC where Secure Boot is enabled in hardware.
Secure Boot on Gigabyte motherboards
What should you do if the problem remains even after enabling the option? And most likely, these steps will need to be taken after each BIOS update.
Fix #1
If the BIOS reports Secure Boot – Enabled but the Active flag stays Off, a quick double-toggle usually clears the state:
- Open Secure Boot. Note the value of Secure Boot Mode (Standard or Custom).
- Change it to Custom from Standard (or the opposite), save, and reboot.
- Re-enter BIOS, restore Secure Boot Mode to its original value, save, and reboot again.
On the next power-up, the status should read Enabled – Active. Battlefield 6 and the Javelin anti-cheat will then load without errors.
Fix #2
On some Gigabyte B650-series boards, flashing the firmware clears the Secure Boot keys. To restore them:
- In Secure Boot Mode, switch Standard to Custom; the remaining fields become editable.
- Choose Expert Key Management. At the top, verify that Vendor Keys and Valid are both highlighted, and that every entry in the key table shows 0 KB.
- Select Restore Default Keys. Confirm Yes, but when prompted to reboot immediately, choose No.
- Re-check the key table: each entry should now show several kilobytes instead of zero.
- Press Esc once. The status pane at the right should read User / Enabled / Active.
- Save and exit (F10). The first cold boot may take longer than usual while memory training runs.
Disabling Secure Boot
To debug mods, install legacy drivers, or test an alternative OS, you may need to run without signature verification. In the same UEFI section where you enabled it, set Secure Boot to Disabled; if asked, keep the existing PK/KEK keys so you can reactivate protection quickly.
When Battlefield starts, Javelin will detect that Secure Boot is off and block online play, so run in unsigned mode only as long as necessary. Re-enabling protection is a single switch followed by one reboot; after that, msinfo32 will again report Secure Boot State: Enabled.
FAQ
Does my motherboard or graphics card support Secure Boot?
Secure Boot support is provided by the motherboard’s UEFI firmware, not by the graphics adapter. If the firmware menu contains a Secure Boot or Platform Key section, the hardware already implements the feature, and Windows can use it. On boards released after 2014, the required logic is almost always present; rare exceptions include some office-class OEM systems built on older Intel H-series or AMD A-series chipsets.
How to turn on Secure Boot?
To enable Secure Boot, enter your PC’s BIOS and locate the Secure Boot option. For detailed instructions, refer to the “How to Enable Secure Boot” section of this article or visit EA’s site.
How do I know if my disk is GPT?
Open Disk Management, right-click the system disk, choose Properties, Volumes, and look at Partition Style:
- GPT (GUID Partition Table). No conversion is required.
- MBR (Master Boot Record. You must run mbr2gpt /convert from the Windows recovery environment before enabling Secure Boot.
Do I need to re-enable Secure Boot after major Windows updates?
No. Updates modify files in the EFI partition but do not touch the PK/KEK keys stored in the SPI flash or the firmware switch. Secure Boot stays active until you deactivate it in UEFI or clear CMOS.
Can incompatible drivers still break the game with Secure Boot enabled?
Yes, but only if a driver is installed with an altered signature or loaded in Test Mode. Such modules are not validated and are excluded from the trusted boot chain; Battlefield will raise a kernel-protection error and exit before the main menu appears.
Will turning Secure Boot on and off slow down start-up?
No. Key verification takes only a few milliseconds before the Windows bootloader runs and has no measurable impact on OS or game load times.
Secure Boot in Battlefield 6: Summary
Secure Boot is more than a box to tick for Battlefield’s Javelin anti-cheat: it is a foundational layer for trusted system start-up. A single visit to UEFI, enrolling the factory PK/KEK keys, and (if necessary) converting the system disk to GPT resolves Javelin errors, hardens the platform against malicious drivers, and reduces disputes over unfair play.
The first game to require Secure Boot was Valorant from Riot Games. However, EA and DICE have set a new trend, with Activision Blizzard announcing that their anti-cheat in Call of Duty: Black Ops 7 will require Secure Boot and TPM 2.0. Krafton’s PUBG: Battlegrounds has also stated that its anti-cheat is moving to the kernel level.
Such anti-cheats have their advantages and disadvantages, which will be discussed in a separate article, but you need to understand where the gaming industry is heading. It is also essential to recognize that no anti-cheat is a panacea against cheaters, as the production of cheats constitutes a substantial industry targeting not just regular players, but also full-time job RMT farmers and eSports athletes.